How to Upgrade Stock Fans on AKiTiO Node
- Upgrade 120mm front fan only.
- Remove/Upgrade PSU fan and/or upgrade the front. (this will void the warranty)
- Exchange PSU and/or upgrade the front. (same as above)
Getting Ready to Upgrade
- Before taking out any tools, make sure to turn off the Node and unplug it from the power source and the computer.
- Remove the screws on the case and open it. (depending on your setup, you could have used all 8 standard screws, or just 2 tool-free ones, or etc.)
- Unplug the graphics card power connector, remove the slot screws securing the GPU, and take out the GPU. You’ll need the room to work on the Node.
How to Upgrade 120mm Front Fan
- On the front of the box, there are 4 screws securing cosmetic screen. Remove them. 2 of them are in the corner, so it could be tricky. (optimally, use flexible extension with a screwdriver bit)
- With the screen removed, unmount the stock 120mm fan from the box.
- Unplug the fan from the board; it’s at the bottom right and labeled FAN, next to LED port.
- (optional) If your fan cables are holstered on the wall with cable ties, you’ll need to nip them.
- Install the new fan by mounting it on to the box.
- (optional and recommended) If your fan did not come with a grill, you can re-use the grill from the stock fan. I highly recommend using a grill, since having loose wires inside such a small place can obstruct the fan.
- Plug the fan cables to the same port.
- Re-install the front screen/grill.
Removing PSU
- In order to mod anything to the power supply, it must first be removed. At the rear of the box, there are 5 screws surrounding the AC input. Unscrew them.
- Unplug the remaining power connector to the board.
- Now you can slide out the PSU.
Upgrading/Exchanging PSU
- If the existing power cables from stock PSU are holstered on the wall with cable ties, you can nip them. Make sure the stock PSU is completely detached from the unit and removed.
- (optional) If your new power supply has detachable power connectors, make sure to connect them now. Once the unit is installed, ports are going to be stuck away.
- If you have a jump starter, you can use a jump starter. For the rest of us, regular PSU requires an on signal from a mother board to start. To jump start the power supply, we will use paperclip test. Cut a paperclip in half, making it a long U shape.
- On the 20/24 pin connector, hold the pin header notch upside. You are connecting 4th pin from the left to 5th pin with a paperclip. Any other ground pin, such as 6th or 7th, will work too.
- Once the paperclip is inserted, make sure to use electric duct tape to secure the paperclip. Accidentally touching the paperclip will do no immediate harm, but let’s not take any unnecessary risks.
- (optional) If your new power supply only has a pair or less of PCIe power connectors, you can consider using 2 molex to PCIe adaptor or 2 SATA to PCIe to power the board.
- Slide in the new power supply in place. You should be looking for the alignment of fans, AC input and switch.
Upgrading or Removing the Fan on PSU (the fan cannot be thicker than 15mm)
- On the top of the power supply, where you can see the fan and the inners, there are 4 screws that are closer to the edges holding the lid in. Unscrew them, and you can take the top off.
- The fan header is actually underneath all the power connectors. Simply pop out the round edge protector surrounding the power connectors, and remove the the connectors through the cutout on the side. Now you can cautiously make room to work on the fan.
- With extra caution, unplug the fan. Be warned, the port is surprisingly brittle.
- Unscrew the fan from the top and completely remove the fan.
- Mount the new fan in place.
- Plug the fan power cables back in; if the port isn’t working properly, you can also reroute it through the power connectors, and draw power from there.
- Before closing the lid, check how you are going to store the cable in the limited space. Make sure cables and connectors will not obstruct the fan.
- Close the lid and secure it.
- Reconnect the power connectors to the board.
- Install the power supply back on to the box.
Finishing Up
- Put the GPU back on.
- Before putting the case back on, test if all the fans are working properly.
- Put the case back on.
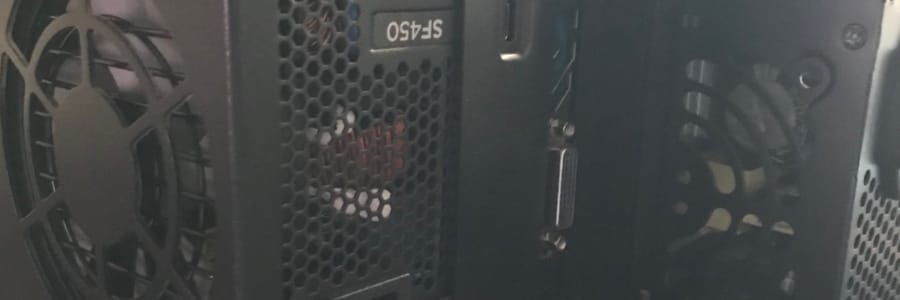
One of the big ticket item on my review was its counteractive warranty policy on an appraised product for its “mod-friendliness”. While I would also advise against modding PSU, it is hardly an excuse against putting the lid on ear-splitting noise. Fortunately, since the enclosure adopted standardized hardwares, I wouldn’t jump through hoops to hold the manufacturer accountable. That being said, my recommendation is to upgrade 120mm front fan and upgrade the PSU. If you are interested in staying under budget, simply remove the fan from the power supply instead of upgrading it. The unit uses slimmer, around 12.5mm thick 80mm-wide fan. The regular high-end fans I could find were mostly 25mm thick, making the upgrade inevitably questionable. If I am going to swap a fan from one knock-off to another, that’s hardly an upgrade. Not only that, we also have to account for limited space inside the power supply. This is my current setup as of now:
- Noctua 120mm fan (NF-S12A FLX) with ultra low noise adapter; connected through 2-3 pin adapter.
- Corsair SF450 PSU; with 2 molex to PCIe power adapter.
After all this modding, I had to come to the terms that competing products with ‘just works’ approach are more sound solution. The only defense for Node, at this point, is that you can upgrade your eGPU down in the line to make a power-hogging, yet silent, real deal workstation. At the risk of sounding like a broken record, the new generation of enclosures will need streamlined design with customization in mind, much like PC cases, with significantly lower prices; and it can’t look sweeter than it should.